Adding Images
Find Openly Licensed Images
Ensure you have permission to use images in your open textbook. Below are some good places to find free-to-use images. Check license terms for individual images as they vary.
| Flickr: Creative Commons | Openverse |
When adding an image to your book, always attribute who took the image, where it came from, and any licensing terms. Visit Add Captions to Images and Add Image Attribution Statements below to learn more.
How to Add an Image
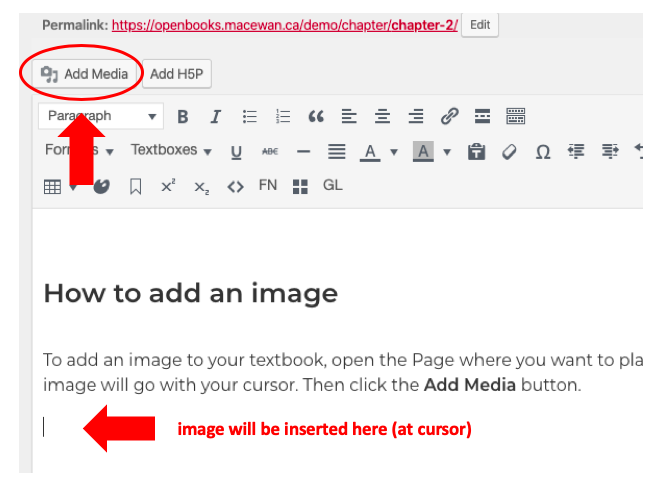
To add an image to your textbook, open the page where you want to place the image. Select the spot where the image will go with your cursor. Then click the Add Media button (see Figure 3.7.1).
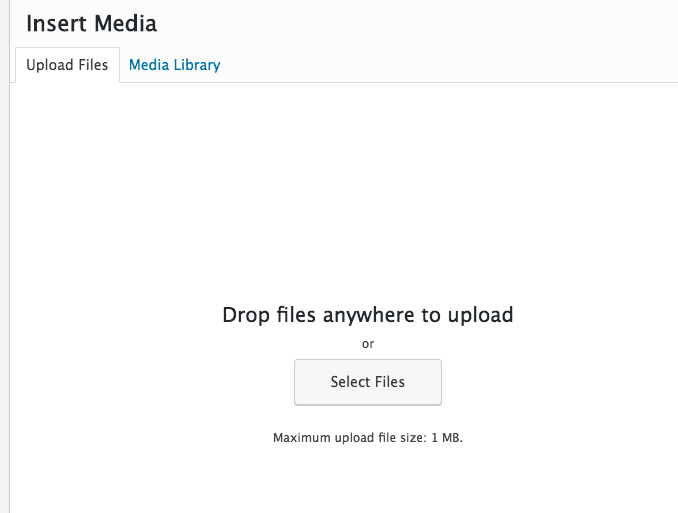
You will be taken to an Insert Media screen where you can choose a previously uploaded image or you can upload a new image. To upload a new image, click on the Upload Files tab in the upper left corner and then on Select Files in the middle of that page. This will allow you to search for image files to add from your computer (Figure 3.7.2).
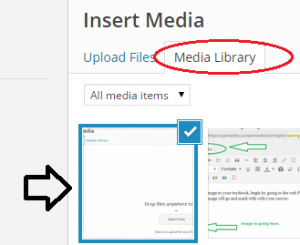
If you already have image files in your Media Library, simply select that tab and the image you want to add or insert. The selected item will be encircled by a blue border and have a blue/white check mark in the top right corner.
Complete this task by clicking on the Insert into chapter button in the bottom right corner.

Finally, make sure that your image is centred correctly and the right size. We strongly recommend that:
- All images are centred
- The width does not exceed 500 pixels
- The length does not exceed 500 pixels
See “Editing an Image” below for details on how to adjust an image.
Images that do not follow the above guidelines often produce PDFs that are less readable. A PDF file is one of the many formats offered for most textbooks in our collection. It is also used to create print-on-demand copies.
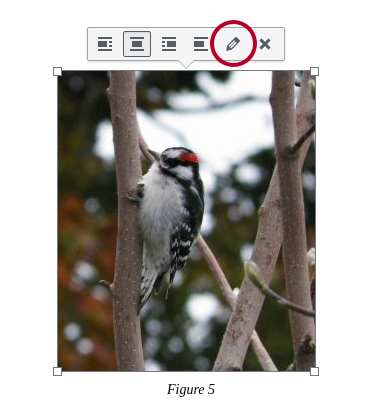
To change the placement or size of an image that has already been added to a page, simply click anywhere on the image. You will see a menu of options appear above the image. Use the pencil to edit the image and the X to delete the image.
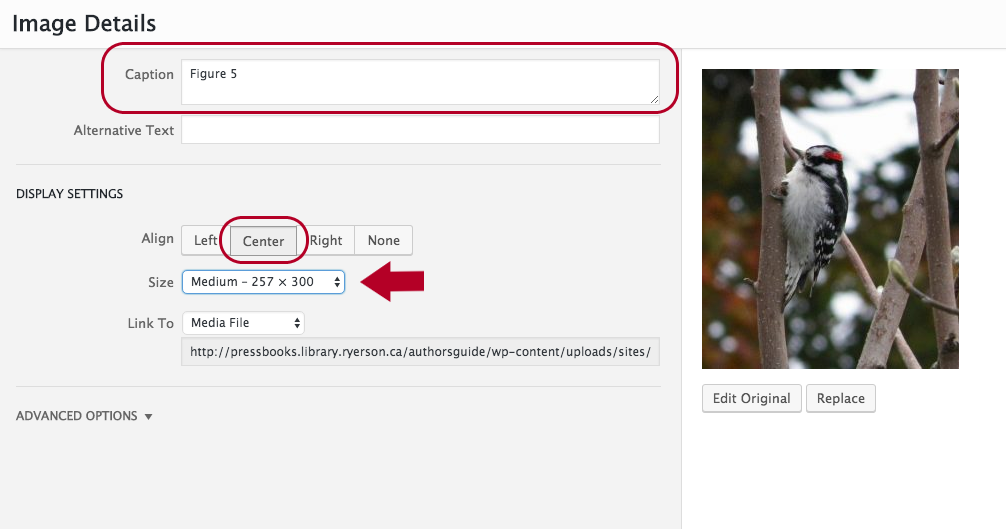
After you click on the pencil icon, the Image Details box will appear. Here you can:
- Add text for the image’s caption. (See Add Captions to Images and Add Image Attribution Statements for details.)
- Under DISPLAY SETTINGS, select “Center”. We recommend that you centre images.
- Using the “Size” dropdown list, determine if any of the sizes are the correct size for your image. If not, then select “Custom Size”…

3. Using the Width OR Height boxes, enter the correct number of pixels. Note that changing one of these parameters, e.g. Width, will automatically adjust the other, e.g. Height.
4. Ensure that either “None” or “Media File” is selected by the “Link To” drop-down list, which enables a reader to open up the image separate from the chapter.
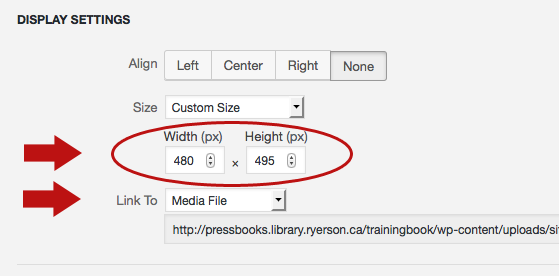
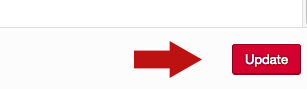
5. Save changes by clicking the Update button in the lower right corner of the page, and then Save.
Add Captions to Images
Caption descriptions should be added beneath images to provide the reader with details and context.
Add caption descriptions beneath images using the Pressbooks caption button:
- Click anywhere on an image you have added.
- Locate and click on the pencil icon that appears in the upper left corner of the image.
- Enter description in the Caption field.
- Add a clear description of the image in the Alternative (Alt) Text field for accessibility. See “Alternative Text Descriptions.”
- Click on “Update” and then Save the page.
What to Include in a Caption
When adding the caption description, be sure to use a numbering system that incorporates the chapter number and image sequence within the chapter section.
After numbering the figure or table, provide a description:
Add Image Attribution Statements
Attribution statements are used to credit the author/creator of an image, provide its source, and detail any copyright terms.
Visit Attribution Statements for guidance on how to create an attribution statement.
Image attributions can either be included in the caption area beneath an image or in an Attributions section at the end of a chapter or section.
Who Gets Attribution for an Image?
It is important to understand WHO to give credit to for an image. Frequently, especially for a work in the public domain, it is not the artist who created the original work. Instead, you must attribute the individual who created the version of the work that you are using in your book or educational resource. In other words, you are giving attribution to, for example, a photographer of an original painting.
Below is a photograph of the famous painting, The Night Watch, by Rembrandt. In the attribution statement, credit is given to the photographer, not Rembrandt (see Figure 3.8.2).

Attributing Creative Commons Licensed Images
Attributions for images under a Creative Commons license should include this license information (see Figure 3.8.3).

If you have modified an image under a Creative Commons license in some way, indicate this in your attribution statement (see Figure 3.8.4).
Note: If an image includes “ND” (no derivatives) as part of a Creative Commons license, the image cannot be changed. This includes cropping.
Including an Image Source Statement
Sometimes it is significant to the textbook subject matter that the physical location of something pictured, like a painting in a museum collection, be noted as part of the attribution statement. If required and available, a source statement can be included (see Figure 3.8.5)

